This post may contain affiliate links, sponsored content and products received at no cost.

Learn how to make DIY personalized acrylic stocking tags using the xTool S1, a 20W diode laser!
These darling custom stocking tags can be altered to be made as leather stocking tags, wood stocking tags or acrylic stocking tags.
Add special name tags to each stocking so the correct recipient gets their Christmas stockings filled with surprises!

These Christmas stocking tags can be added as a fun holiday decor element, added to wrapped presents as gift tags or used to decorate the tree as Christmas ornaments.
These DIY stocking tags can be made of multiple materials, wood, leather or acrylic and decorated multiple ways.
I am going to show you the step by step tutorial for simple acrylic for my initial tags and maybe I’ll get more exotic next year.

CAN A DIODE LASER CUT ACRYLIC?
YES!
xTool Machines:
affiliate links:
Black acrylic is the smoothest and easiest to cut…and for a long time, there wasn’t a ton of colors that you could cut with a diode laser. It does need to be cast acrylic…no glitters, transparency or mirrored finish.
However, acrylic retailers are helping us out and giving us cast acrylic with a black core…and some colors or even metallic on top that can be cut as smooth and wonderfully as black acrylic.
Check out Houston Acrylic for this amazing 1/8″ Champagne Gold Metallic Cast Acrylic, that cuts perfect in one pass on the black acrylic settings…no melting around the edges of the tag!
Houston Acrylic has laserable leatherette, in a variety of colors and they would make perfect stocking tags as well!
(Not an affiliate link, but they are a family owned business and they are worth supporting!)

Supplies Needed for Acrylic Stocking Tags:
affiliate links

Step 1: Design the Stocking Tag
First step, design the custom order, I used xTool Creative Space (XCS) to design the stocking tags.
Pick your favorite font and slide all the letters of a name or a family’s name together to touch so they stay connected after being cut.
On one of the designs I did some engraving and cut out a big oval tag.
On the other 2 designs, I just did the names with a circle loop for hanging later.
Decide what works best for your custom stocking tag designs.

Step 2: Laser Cut the Acrylic
Next, send the project to the laser cutting machine.
Use the standard settings for Black Acrylic on the xTool machine.
I used 100 power and 3 speed for the cut layer and for the engraving I did 300 lines per inch.

Step 3: Fill in Engraving
If you decided to engrave your stocking tags, leave the protective cover on the acrylic or wood when cutting, then paint the engraved area with acrylic craft paint while the cover is still on.
Then peel off the protective covering to reveal the foil layer and the painted area will be perfect.

Step 4: Finishing Touches
Next step is finishing touches, the acrylic cuts so beautifully and smoothly no melting at all.
Now you can tie them to individual stockings hanging on the fireplace…or add some fun additional elements to give them the perfect touch.

If you made your stocking tags with leather, they should be ready to use as Christmas decorations immediately.
If you decided on wood cut outs; maybe add some dark walnut stain to the wood, some wood beads on the string attached to the tag, or use a hot glue gun and some German glass glitter around the edges of the tag.
Lots of options for these fun projects this holiday season!

I love these new stocking tags made with gold acrylic and have way more diy project ideas!
New stocking tags are a best seller this time of year, this is a money maker!

That’s it!
Make DIY personalized acrylic stocking tags, ornaments, gift tags, keychains or jewelry this holiday season!
Use gorgeous gold cast acrylic with a black core or two-toned acrylic for smooth and clean cuts.
This fun tutorial also works with wood, leather, leatherette and more!
Like, Pin and Save!
Check out these other xTool Laser Cutting Machine crafts for the holidays!
Cardinals are such a beloved sign of Christmas, a reminder of loved ones long passed and a good omen.
Learn how to make laser cut wooden cardinal Christmas ornaments using the xTool S1.
Make a bunch of laser cut ornaments for family, friends and neighbor gifts.

Learn how to make a bunch of cards easily using xTool Screen Printing system.
Silk screening on paper is easy, inexpensive and a great way to mass produce handmade cards.
The silk screen paint is slightly raised, giving the cards a wonderful texture.
Great way to make a bunch of holiday or Christmas cards, or generic cards that can be giving as thank you’s or neighbor and friend gifts!
")
Learn how to make a gorgeous nursery name sign for a new bundle of joy!
Make a name sign for any occasion, not just a new baby…change the text for a wedding, family name or with a fun saying.
This wood sign is perfect for customizing with a first and middle name, and looks great as home decor.
")
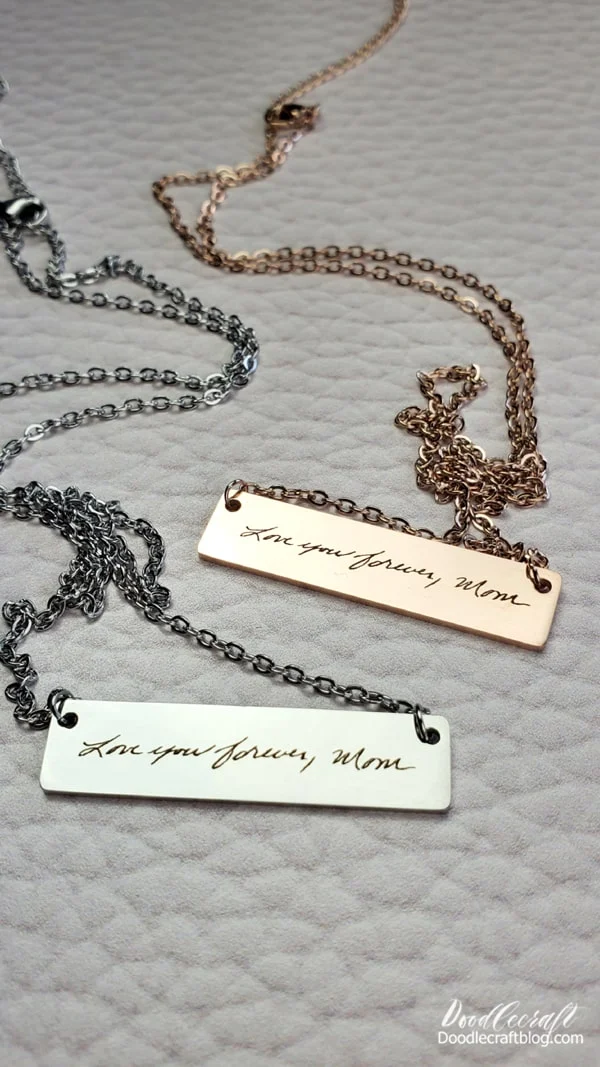
Turn a love letter signature into a heirloom keepsake!
Learn how to engrave stainless steel pendants with the xTool S1 2W infrared laser.
Think of all the handmade and personalized gifts you can make with this amazing technique!
These are gorgeously engraved permanent marks and will not wipe off…turn your handwriting into a treasure.
Here’s the step-by-step guide!
Learn how easy it is to make a laser engraved journal or notebook with xTool laser cutting machine.
Every time I do a laser cutting project it becomes my absolute favorite–and this is no exception, I totally love these faux leather engraved journals!
Engraving on journals is so fast, just minutes, and makes a gorgeous handmade gift, branded business merchandise or custom swag.
 xTool Creative Space Image to engrave")
Learn how to make a gorgeous DIY earring display perfect for keeping track of earrings or for displaying earrings for sale at an event!
If you have a big earring collection there are so many wonderful earring stand options–even combining with jewelry organizer solutions too!

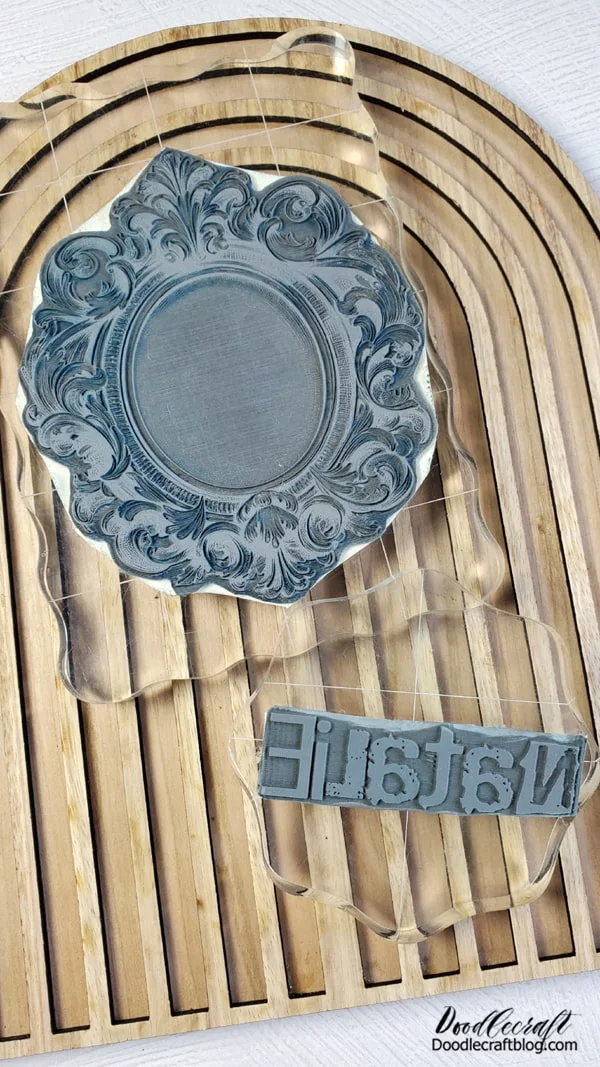
Learn how to make your own custom rubber stamps with the xTool S1 Laser cutting and laser engraving machine!
I am absolutely addicted to making rubber stamps now and you will be too–they are super intricate and detailed, I’m in love!
Layered laser cut wood signs are beautiful, fun to make, and totally the thing right now!
The intricate cuts of a laser cutter make it possible to stack very delicate layers into a work of art easily and making it not quite so delicate.
The depth, texture and colors make this little planter sign so intriguing!

Learn how to make stunning leather bracelets with the xTool Laser Cutting machine.
It’s easy to make laser cut leather bracelet and makes a meaningful gift for a special occasion!
These wrap-around wrist bracelets are easy to make and secure with a stud rivet…they are adjustable in size, can be customized and only take 3 supplies!

Engrave a mirror with the xTool S1 Laser Cutting machine for a gorgeous statement piece of home decor.
Add an inspirational message or family motto on a mirror with glass laser engraving!
The possibilities with the xTool electronic products are endless!

